

The “best” biltong Dryer
In my previous blog I speak about Biltong Recipes. Here we will take a quick look at what a biltong dryer looks like.
I put best in inverted commas above. Like the biltong recipe page where I talk about the best spice recipe, there is no best dryer.
If you live in a cool dry climate and have a room with good ventilation then you could string up some twine and just hang the wet biltong there. It’s as simple as that.
If you Google biltong dryer you will see many designs. If you are into building stuff you can really have a lot of fun building yourself one.
If you just want to get up and running ASAP then there is the quick and nasty route too. A lot has been spoken about not using wood as bacteria can get into the grain of the wood. I chose plastic and metal firstly beacuse it was really easy to find a ready made container and secondly it was really easy to wash out. My first version was built using a home depot bucket.
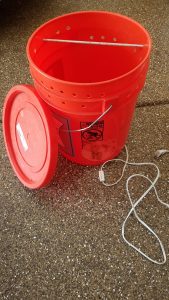
You can see the hole cut in the side for the fan. Inside I mounted a small light socket in which I could place a 40w candelabra lamp. A few holes drilled across the top for the aluminium rods and a few extra holes to allow for circulation once the lid was in place. Once I proved the concept I then upgraded to a much bigger storage container. I used the same fan from the home depot bucket and mounted a similar light socket inside the container.
FAN UPDATE – After doing a lot of experimenting with fans it appears that drawing air out of the container is a more efficient way of drying the meat than blowing the air through the container. The easiest way to do this is to just turn the fan around. It was not possible to do that with the small desk fan I was using. I removed this 12 volt fan from an old computer power supply.

I placed it against the opening in the container such that it was blowing air out (creating a vacuum in the container) rather than blowing air in. I was amazed at how well the meat dried using this method. Next step will be to mount it permanently so that there are no air leaks around it.
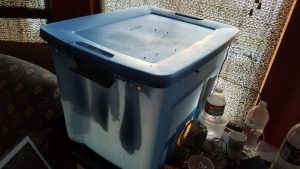
I added a whole lot more aluminium rods providing enough hanging space for up to about 25lbs of meat.
For hooks I simply used paper clips but if you really want to go fancy there are plastic meat hooks or you could get bicycle spoke and bend them into really sturdy stainless steel hooks.
Contact me if you have any further questions.